 Another image to honor the memory of Michael Jackson. This IR photo shows empty chairs, but you are not alone, I know it.
 Highton-Ridley noticed a branch on the left. Thx man! Highton-Ridley noticed a branch on the left. Thx man! |
Another image to honor the memory of Michael Jackson. This IR photo shows empty chairs, but you are not alone, I know it.| Highton-Ridley noticed a branch on the left. Thx man! |


 The sky is still Crying over the loss of MJ. Photo number 5 of this series dedicated to the Moonwalker.
 And here you have another image dedicated to Michael Jackson. This time a mysterious path and a special light, two characteristics of the King of Pop.
Read More!
And here you have another image dedicated to Michael Jackson. This time a mysterious path and a special light, two characteristics of the King of Pop.
Read More!
 Today I decided I will dedicate a FULL week of photos to Michael Jackson as my humble homage to him. This is the first of a series of images dedicated to the greatest entertainer ever, his genuinely remarkable talent deserved to conquer the world.
 No matter what your personal feelings on Michael Jackson were as a person or about his run-ins with trouble, you cannot deny he was one of the best performers in the world. He redefined dance performance in combination with #1 hits time after time. The moonwalk is a classic. I still remember "Beat It", "Billie Jean", "Thriller", "Black or White" and "Scream".
 We all need a bit of hope so:
 This HDR (3 shots) is dedicated to Pablo.
 This photo is dedicated to a very important person who needs to walk down the right path again. Hope this small gift can be part of it.

 EXIF. ISO: 100, Exposure: 1/1000 sec, Aperture: 6.3, Focal Length: 100mm,Flash Used: No, Post Processing: gimp.
 Time to party since I have 100 posts in my blog... That's why I wanted to post one of the many entrances to the Caesar's Palace @ Vegas, sin city!
Read More!
Time to party since I have 100 posts in my blog... That's why I wanted to post one of the many entrances to the Caesar's Palace @ Vegas, sin city!
Read More!
 My friend Toni Turi wanted to see some images "with an object in light and shadow" and he also said "I like a lot the water images too". I remember you like landscapes in B&W too... so here you have, my Italian friend (aka amico), I tried to combine everything you enjoy in photography :). I hope you like them!
Read More!
My friend Toni Turi wanted to see some images "with an object in light and shadow" and he also said "I like a lot the water images too". I remember you like landscapes in B&W too... so here you have, my Italian friend (aka amico), I tried to combine everything you enjoy in photography :). I hope you like them!
Read More!
 This is a view from a corner of the main square (Plaza de Armas) of Cuzco, Peru.
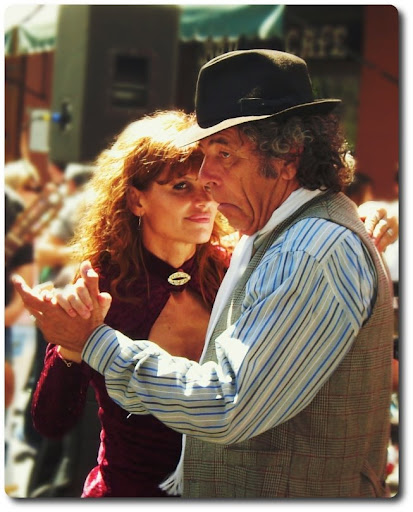 Known for its bohemian charm, and slightly run down historic appeal, San Telmo (Buenos Aires, Argentina) is the neighborhood of arts and antiques, tango and timelessness. San Telmo is energy-filled, quaint and funky on any day of the week, but on Sundays it truly comes to life. Centered around the Antiques Fair in Plaza Dorrego, and stretching down the cobblestone Calle Defensa, a Sunday visit to San Telmo is a highlight for visitors to Buenos Aires.
 This photo is dedicated to Konstantin B (as I promised here). This image was taken from Navy Pier looking towards the Hancock Tower.
Read More!
This photo is dedicated to Konstantin B (as I promised here). This image was taken from Navy Pier looking towards the Hancock Tower.
Read More!
 EXIF. ISO: 100, Exposure: 1/125 sec, Aperture: 8, Focal Length: 100mm,Flash Used: No, Post Processing: gimp.
 EXIF. ISO: 100, Exposure: 1/400 sec, Aperture: 2.8, Focal Length: 100mm,Flash Used: No, Post Processing: gimp.
 EXIF. ISO: 200, Exposure: 1/60 sec, Aperture: 9, Focal Length: 100mm,Flash Used: No, Post Processing: gimp.
 EXIF. ISO: 100, Exposure: 1/125 sec, Aperture: 8, Focal Length: 100mm,Flash Used: No, Post Processing: gimp.
 EXIF. ISO: 100, Exposure: 1/125 sec, Aperture: 8, Focal Length: 100mm,Flash Used: No, Post Processing: gimp.
 EXIF. ISO: 100, Exposure: 1/400 sec, Aperture: 2.8, Focal Length: 100mm,Flash Used: No, Post Processing: gimp.
 This is our sea cost at Bahia Blanca ("White Bay"), as you can see there is no white bay here... Anyway I think the first light over this landscape deserved to be remembered. I promise much more from this location.
 This photography is dedicated to Patricio, well done my friend -congrats for your PhD!
Possibly the most useful tool available in digital photography is the histogram. It could also well be the least understood. In this article we will look at what a camera histogram tells the photographer and how best to utilize that information.
I am frequently asked why I frequently look at the LCD of my DSLR after taking a shot. The answer is that I’m barely even aware of the image on the LCD, it’s the histogram that commands my attention.


A light meter reading tells you what exposure will render a standard 18% gray reference card as a mid tone. This reading may have been made because the camera read a variety of areas of the scene and averaged them out, or because you read the highlights, the shadows and some other areas and decided that a particular setting would yield the best compromise exposure for that scene.
This setting, like every other that you or your automated camera makes, is a compromise. In most real world situations there is no such thing as an ideal or “perfect” exposure. There is simply one that places the tonal values found in the scene most appropriately within the capability range of the camera’s imaging chip. And “most appropriately” means that the mid-tones found in the image fall roughly half way between the darkest and the brightest values. Hold that thought while we digress for a moment and look at the concept of dynamic range.
The digital imaging chip in your camera is very similar to colour transparency film when it comes to its sensitivity to light.
Like slide film, if a part of the image receives too much light it becomes burned out, and if too little light it is rendered as black. A recognizable image is only recorded if the light hitting the chip falls within a range of about 5 F stops. (Remember — each F stop is a doubling or halving of the amount of light hitting the film). With digital things are much the same and even the dynamic range is about the same as for slide film; about 5 stops. Also keep in mind that the total range of brightness values encountered in the real world is only about 10 stops — from the dimmest light that you can read in to the brightest beach or snow scene in which you might find yourself).

In an image recorded in 8 bit mode (we’ll ignore 12 , 14 and 16 bit modes for this tutorial) there are 256 discrete brightness levels between absolute black (0) and absolute white (255). 18% gray (the point that all exposure metering measures) has a numeric value of about 128, half way between black and white. If you think about it this is fairly logical. This means that if you are exposing for an average subject, say something like a scene with people, trees, grass etc, these subjects will be exposed at about the mid point of the camera’s dynamic range. Why is this important?
This is because if a subject is exposed too close to either extreme you will run into the limitations of the chip’s ability to record the image. Too close to 0 (absolute black) and there won’t be an image at all, or it will be very dark and noisy, and too close to 255 (absolute white) and there will be nothing there except oversaturated pixels with no image information.
This is where the histogram comes in. It is a simple graph that displays where all of the brightness levels contained in the scene are found, from the darkest to the brightest. These values are arrayed across the bottom of the graph from left (darkest) to right (brightest). The vertical axis (the height of points on the graph) shows how much of the image is found at any particular brightness level.

Note that I somewhat arbitrarily labeled each of the five zones (or F stops) containing the dynamic range recordable by the cameras as Very Dark / Dark / Medium / Light / Very Light. But each of these 1 stop ranges contains within it just over 50 discrete brightness levels. (5X50=250 not 256, but who’s counting?) Seriously though, it’s a good idea to consider about 4- 5 points at the very bottom (black) and another 4-5 points at the very top of the scale (white) to be so close to the extremes as to not really be part of the image-forming segment of the graph. (NB: This is an oversimplified explanation. For how the data is really distributed please read Expose to the Right.)


So now things start to become clearer. The histogram shows us quite a bit, and just as a glance at the hands of an analogue watch instantly tell you the time without your even being conscious of the exact numeric values, similarly once you become proficient at “reading” a histogram you’ll be able to almost instantly evaluate the quality of the exposure that the camera is making. This is especially true when the histogram is superimposed on or just next to the image itself, making the graph that much more meaningful. Lets look at some examples.
As mentioned earlier, with the exception of a histogram that is very heavily bunched up to the right (overexposed) there really isn’t such a thing as a “bad” histogram, or for that matter a “good” one. The histogram simply shows you the way things are, and its then up to you to decide if what it is telling you needs to be acted upon. Here are some examples.
 |  |
 |  |
Here we see the same photograph taken with exposures about three and a half stops apart. Both were at an aperture of f/9. The one on the left was shot at 1/2000 sec and the one on the right at 1/200 sec. The histogram of the one at the left is bunched up at the dark end (underexposed) and the one on the right is bunched up at the light end (overexposed).
There wasn’t an exposure with today’s digital (or transparency film) cameras that could encompass the full dynamic range of this photograph — which is about 8 stops. You therefore have to make some decisions on how to handle such a scene. To stuff 8 stops worth of dynamic range into a recorded image that can only handle 5 stops your choices are….
— use balanced fill flash on the foreground
— use a graduated neutral density filter
— take multiple exposures and merge them digitally
— go home
Fill flash wouldn’t work in this case because the foreground subject was too large and too distant. I didn’t have any graduated neutral density filters with me (I no longer use them), and going home wasn’t what I had in mind. Instead I shot the two frames seen above at about 3 1/2 stops apart and merged them digitally using one of the processes described in Digital Blending. The image below is the result. Not great art, but it illustrates the point.
 |
 |
As mentioned earlier, with the possible exception of showing badly blown out highlights there really is no such thing as a bad histogram. They just are.
 |
 |
This low key shot’s histogram shows that almost all of the data in the image is down in the lowest areas (darkest) with just a small amount of data showing the bright moon. But since the dark areas aren’t right up against the left hand side and the light areas aren’t up against the right hand side of the histogram, the subject falls within the dynamic range that can be captured. The detail in the moon is what “makes” this shot.
 |
 |
In this “high key” image we see just the opposite. Almost every value seen is toward the right side of the histogram, in the highlight area. That’s where I wanted it to be to properly reproduce the brightness found in this snow scene. Yet, since it doesn’t bump up against the right hand side of the histogram I know that none of the highlights are blown out.
Not too long ago a histogram was something mysterious. Today it has become a valuable tool for the photographer who wants to gain mastery of their digital camera’s image quality. I hope that this tutorial has helped remove some of the mystery for you.
Start using the histogram review feature of your digital camera. Set your camera to display a combined thumbnail and histogram for 5-10 seconds after every frame. Get in the habit of glancing at it. It’s the greatest invention since the built-in light meter.
 |
| |
|


