Depth of Field in Photography

2comments
I borrowed this article from Fredrik Silverglimth in Photography, Photography BasicsDepth of Field

Depth of field (DOF) is the distance in front and beyond the object that is in focus. This tutorial will teach you about how to use Depth of Field in your own photography.

Depth of Field in Photoshop

In case you’re looking for a way to imitate Depth of Field in Photoshop (rather than photography, as this tutorial illustrates), we’ve got a great tutorial that will teach you how to enhance your graphics with depth of field in photoshop here at Tutorial9!

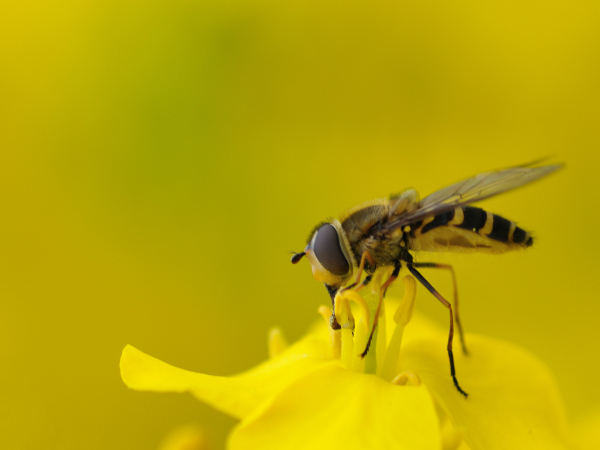
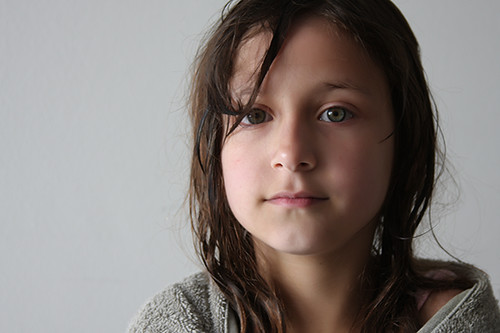
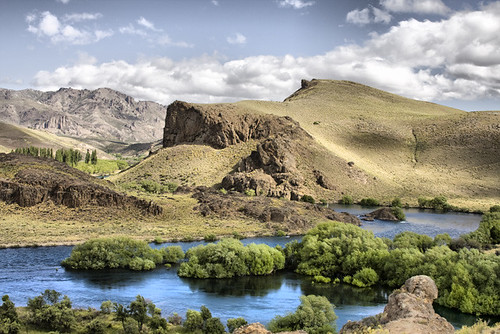
A short depth of field can be very useful when you want to isolate your object from the background, such as when taking portraits or macro photography. A large depth of field is great when you photograph landscapes and overall when you want every detail to be in focus.


Control the Depth of Field

There are three variables that affect DOF, the size of the Aperture, the distance to the object and what lens you’re using. (There is a fourth thing that affects the DOF, but that’s the size of the sensor and unless you have two cameras with different sensor sizes this isn’t something to take into account.)

dof_aperture Depth of Field in Photography
As you can see in the illustration above, a lower f-number equals a shorter depth of field. A higher f-number will give you focus over a longer distance — when you’re having a hard time getting the correct focus it might be a good idea to extend your DOF by changing the aperture.

dof_distance Depth of Field in Photography
The distance between you and the object is also important, the closer you are to the object the shorter the DOF. If you’re photographing a person but needs to have a high f-number you can still get a very short DOF by keeping the distance between you and the person to a minimum.

dof_lens Depth of Field in Photography
The last thing you can do to affect your DOF is to change the lens. A wide-angle lens has a much greater DOF than a telephoto lens; the most extreme wide-angle and fish-eye lenses don’t even have to focus because they are so sharp on every aperture for the entire DOF (making for excellent scenic shots).

It’s important to know that the depth of field is greater behind the object than in front of it. If you want to photograph, let’s say 20 kids standing in a line, and you want as many of them as possible to be in focus, but you’re unable to have a small aperture, you should focus on the 6th-7th kid in line, which would balance the field of focus about right (depending on your distance to the kids). If you would focus on the 10th kid, that is the one in the middle, the first few kids would be more out of focus than the kids at the back of the line.

Unlike some other parts of photography, the depth of field works in your favor almost every time. If you want to photograph landscapes you usually have a wide-angle lens — the object is far away and you use a high f-number — all these things together gives you a depth to infinity. And if you’re photographing macro you’re close to the object, you have a telephoto lens and often a low f-number — all these things will give you a very short depth which will make your object stand out and make the background soft and non-distracting.

Bokeh

The word Bokeh derives from the Japanese word Boke which means “blur” or “fuzzy“, and that’s just what the term refers to in photography. The out of focus areas in the photograph look very different depending on the depth of field as well as the lens used, some lenses produces much better bokeh than other lenses. The shape of the aperture is one of the most important parts together with the quality of the optics when it comes to how the out of focus areas appear.

bokeh Depth of Field in Photography
The photograph above is meant to illustrate what bokeh is. The lens used was the Canon 50mm f/1.8 which isn’t considered to be a good bokeh lens due to it’s 5 aperture blades.

Read More!
or Depth of Field in PhotographySocialTwist Tell-a-Friend Traducir al Español / Translate

Three articles on High Dynamic Range Photography (HDR)

NO comments
I keep receiving requests to talk about High Dynamic Range (HDR) Photography, specially from friends… Since I don’t have the time to do it (or my PhD advisor will kill me!) I will post just 3 URLs… Hope now everything looks better, well that’s the idea behind HDR!
Read More!
or Three articles on High Dynamic Range Photography (HDR)SocialTwist Tell-a-Friend Traducir al Español / Translate

Panning

NO comments

Today I’d like to take a brief look at moving subjects by ‘panning’.

Panning is a technique that can produce amazing results (if you perfect it…. or get lucky) but is also one that can take a lot of practice to get right.

The basic idea behind panning as a technique is that you pan your camera along in time with the moving subject and end up getting a relatively sharp subject but a blurred background.

This gives the shot a feeling of movement and speed. It’s particularly useful in capturing any fast moving subject whether it be a racing car, running pet, cyclist etc.

I’ve found that panning seems to work best with moving subjects that are on a relatively straight trajectory which allows you to predict where they’ll be moving to. Objects that are moving side to side are challenging and can result in messy looking shots as the motion blur can be quite erratic.


How do you do it?

  • Select a slightly slower shutter speed than you normally would. Start with 1/30 second and then play around with slower ones. Depending upon the light and the speed of your subject you could end up using anything between 1/60 and 1/8 - although at the slower end you’ll probably end up with camera shake on top of your motion blur.
  • Position yourself in a place where your view of the subject will not be obstructed by anyone or anything else. Also consider the background of your shot. While it will be blurred if there are distracting shapes or colors it could prove to be distracting. Single coloured or plain backgrounds tend to work best.
  • As the subject approaches track it smoothly with your camera. For extra support of your camera if you’re using a longer lens or are feeling a little jittery you might like to use a monopod or tripod with a swivelling head.
  • For best results you’ll probably find that setting yourself up so that you’re parallel to the path of your object (this will help with focussing).
  • If you have a camera with automatic focus tracking you can let the camera do the focussing for you by half pressing the shutter button (depending upon it’s speed and whether it can keep up with the subject)

  • If your camera doesn’t have fast enough auto focussing you’ll need to pre-focus your camera upon the spot that you’ll end up releasing the shutter.
  • Once you’ve released the shutter (do it as gently as possible to reduce camera shake) continue to pan with the subject, even after you’ve heard the shot is complete. This smooth follow through will ensure the motion blur is smooth from start to finish in your shot.
  • If you have an older digital camera or one that is of a more entry level point and shoot variety you could also have to contend with the dreaded ’shutter lag’ problem. Shutter lag is when there is a slight delay from when you press the shutter to when the picture is actually taken. If you experience shutter lag you’ll need to learn to anticipate the moment to take the shot and will definitely need to continue to pan well after you’ve taken the shot.

A variation on the Panning Technique

There are no rules with panning and you might also like to experiment with using your flash while panning. This will only work if the subject is close enough or your flash is powerful enough to have an impact - but will help to further freeze your main subject while giving the background the motion blur you’re after.
If you do use a flash you’ll want to test a variety of settings to get it looking right. In some cases you’ll probably need to pull back the strength of your flash by a half or a third.

Panning and Patience


If you’re going to try panning for the first time you should approach it with an experimental attitude. It can be a lot of fun but can also be quite frustrating. If you’re at a special event where you have fast moving subjects (like a car race etc) you’ll probably want to mix up your style of shooting. Don’t just use this technique all day - instead also shoot some shots at fast shutter speeds. This way you’ll end up with a variety of shots and will probably end up with some useful ones instead of just having a collection of blurry unusable ones.

If you want to practice panning (and it is something that you need to practice - a lot), head out into a busy part of your city and practice on passing traffic. That way you have a never ending supply of subjects.

Also keep in mind that it’s unlikely that your main subject will ever be completely sharp and in focus. This technique is about getting a relatively sharp subject in comparison to it’s background. Some blurring of your main subject can actually add to the feeling of motion in the shot.

Read More!
or PanningSocialTwist Tell-a-Friend Traducir al Español / Translate

Sunflowers ignoring me

NO comments
The sunflowers (Helianthus annuus) are ignoring me... Read More!
or Sunflowers ignoring meSocialTwist Tell-a-Friend Traducir al Español / Translate

Fountain @ Chicago

1 comment
Love the colors of this fountain at night. Hope you like it too. Read More!
or Fountain @ ChicagoSocialTwist Tell-a-Friend Traducir al Español / Translate

Martina (B&W)

NO comments

This is a B&W of Martina (2 years old here). Love her expression.
Click on the photo to see it bigger at flickr Read More!
or Martina (B&W)SocialTwist Tell-a-Friend Traducir al Español / Translate

Yellow Bee

1 comment
Bee

This macro of a bee got the 2nd place at LNP (local newspaper). Read More!
or Yellow BeeSocialTwist Tell-a-Friend Traducir al Español / Translate

Tero al vuelo

NO comments

I catched this flying Tero in Bolson (summer 2008). Technique: motion blur without post processing. Read More!
or Tero al vueloSocialTwist Tell-a-Friend Traducir al Español / Translate

Martín Pescando

NO comments
This is a Martín Pescador (don't know the name of this bird in English), as you can see he made it: he es bringing food to his home.
I took this photography at Rivadavia River (you can see it in the dark background) at Alerces National Park. Read More!
or Martín PescandoSocialTwist Tell-a-Friend Traducir al Español / Translate

Clara, studio shot

NO comments

This is Clara, she is one of the daughters of one of my best friends and as you can see, she is also a beautiful model. Read More!
or Clara, studio shotSocialTwist Tell-a-Friend Traducir al Español / Translate

Cascada del Agrio

NO comments
This is a beautiful waterfall (about 50 meters?) close to Caviahue, a small and lovely town located in the north of Neuquén Province in Argentina.

The colors of these sulfurous waters are incredible... and as you can see, they affect the colors on the volcanic rocks around this place.

This version includes a really nice rainbow. To say the truth I came to this place twice, first time was about 6pm and noticed that light would be better earlier, so I returned next day at 11am! :)

Note: click on the image to see it @ Flickr (here I've added border and played with curves a bit). Read More!
or Cascada del AgrioSocialTwist Tell-a-Friend Traducir al Español / Translate

Anfiteatro (Bariloche, Argentina)

NO comments

Departing from Bariloche and going along Limay river, you reach Anfiteatro, a natural formation that is similar to a Roman amphitheatre (at the right of this image).

Note: this is the first photo I publish here, every post of this kind (not an article) will share following tags: photo, foto. Also I will add tags of type of photography, Location, technique, etc. Read More!
or Anfiteatro (Bariloche, Argentina)SocialTwist Tell-a-Friend Traducir al Español / Translate

Camera modes

NO comments

AUTOMATIC MODES:

  • Auto — everything is on auto, including ISO, flash and image quality
  • Portrait — uses a large aperture to shorten the depth of field
  • Landscape — uses a small aperture to gain more depth of field
  • Sport — uses higher ISO to use faster shutter speeds
  • Night portrait — uses long exposures to capture the entire scene, often combined with built in flash
  • Macro — uses a large aperture to great a softer background

Just Say NO! to Automatic Modes

There is no reason what so ever to use the automatic modes. After you’ve read through this series of articles about photography you should have enough knowledge to control the camera on manual modes — which will result in better photographs.

The Program mode (P) is fine to use, this way you will have the aperture and shutter automatic but still be in control over everything else. Most photographers find a mode that they like and maybe switches between two different modes, this is personal preferences and let me just tell you that far from every professional photographers uses only the fully Manual setting.

I personally use M and Av most of the time, depending on the situation. Av for the situations where I don’t have enough time to set the correct exposure between every shot and then M for the rest.

I usually shoot (perhaps about 80% of my photos) in the Av mode since I use only RAW and I can do some PP if my camera picked a bad shutter speed… and since I have a Canon 40D that’s not the frequent case! Anyway, If I find myself compensating (EV +/-) exposure too often, then I change to M :) … you need the Av mode if you can’t corrext exposure between every shot, for example if you are taking photographies of (wild) children! :)

Cute Martina

Did you think this cute girl of two years old would wait for me to prepare the perfect shot? I think these shots took me about 2 hours! :)

Read More!
or Camera modesSocialTwist Tell-a-Friend Traducir al Español / Translate

Diffraction and Photography

NO comments

This is my 1st post here... I think it will be much more useful than the classic "Hello World".

I was wondering what’s the best aperture for my favorite photography subject:land/cityscapes… Probably F8, perhaps F11… F8 is probably what old photographers would pick in order to have a sharp image without risking DoF.

Well, not an easy answer, it depends on the lens you are using, with a APS-C sensor the magic aperture should be at a bigger aperture (small F number), but where is this point?

Go check that sweet point at http://www.photozone.de and read about MTF (resolution) of the lens you are considering for your next shot! :)

I’ve found my sweet apertures are somewhere between F/4 and F/8 but, as always, YMMV.

Want to read theory about Diffraction? Please go here.

PS: Of course you can not always USE that sweet aperture, it will depend on the available light… if the sun is really really doing his thing then you will need an ND filter in order to use a bigger aperture, etc.

Read More!
or Diffraction and PhotographySocialTwist Tell-a-Friend Traducir al Español / Translate

Contact Me Form


As soon as you press the Send button below your comment will go directly to my inbox, this way you can contact me privately. I promise I'll respond ASAP.
If the form is not working you can use your email application and write to Javier Echaiz.


Your Name :
Your Email :
Subject :
Message :
Image (case-sensitive):
Read More!
Contact Me FormSocialTwist Tell-a-Friend Traducir al Español / Translate

Contact Me


Javier EchaizFirst of all thank you so much for taking the time to visit my blog! I am very glad and honored! Feel free to leave any comments or critiques. I'm always open to constructive comments and suggestions. Just click on the highlighted comments link present on every post (brown splash at top right or "Leave a comment" below the post). If you would rather contact me privately use
Javier Echaiz
One reason why I enjoy photography so much is because it naturally slows me down. Photography is an exercise in patience and persistence.

Creative Commons License All of the images provided on this website are copyrighted to Javier Echaiz and are licensed under a Creative Commons Attribution-NonCommercial-NoDerivs 3.0 License.

If you want Prints of some of these photos drop me a message for price/size quote. I print using the highest quality Photo Papers, and longevity UltraChrome Ink, providing you with an image which is light resistant up to 80 years, as well as water resistant. Each image is quality checked prior to being shipped and it is signed by me. Please note that prints are shipped unframed and unmatted.


Thank you Again for visiting Javier Echaiz Photography!
Read More!
Contact MeSocialTwist Tell-a-Friend Traducir al Español / Translate
 

Javier Echaiz Photography